Axure is one of the best prototyping tools available and as such it is one of the most popular tools used in conjunction with Loop11. Many of Loop11’s users, companies of all sizes, create their prototypes in Axure and then run multiple tests to validate which of their designs perform the best. You can find a case study on prototyping with Axure and Loop11 here.
To make the workflow as seamless as possible we wanted to create this ‘how to’ article to show the exact steps that need to be followed in order to get the best results from using the two tools together.
Axure 9 & above users scroll to the bottom of this article for steps specific for these versions.
Getting the correct URLs from Axure
By default, when an Axure project is launched, it normally features its control sidebar (old and new version shown below). Sometimes this sidebar is minimized, but it’s generally always present.
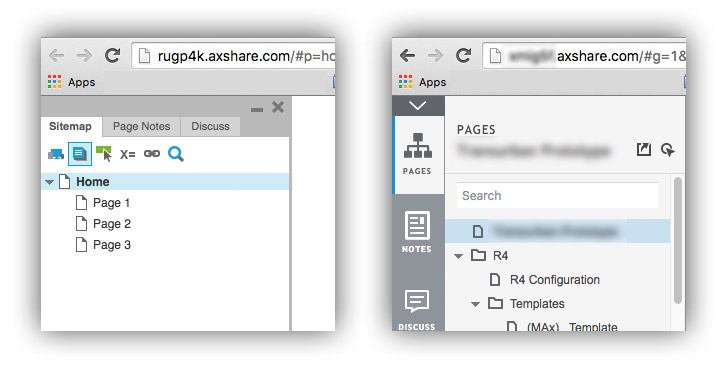
When the sidebar is present, from a technical perspective, it means the Axure design is being rendered via an iFrame. This in itself is fine, however, it presents problems when tracking pages and user interaction within Loop11.
Also, the URL is relevant when setting your start URLs for a Loop11 task.
So, what do you do? Easy. You close the sidebar. This is different from ‘minimizing’ the sidebar. The below image highlights the buttons/links that need to be clicked to close the sidebar.

Once the sidebar is closed, you’ll notice that the URL for the prototype changes slightly. For example, the URL may have initially been https://rugp4k.axshare.com/#p=home but when you close the sidebar it changes to https://rugp4k.axshare.com/home.html. The main different to note is that #p= no longer exists in the second URL, and, .html is now visible. This is what you need to focus on.
If you are not sure whether you’ve close the sidebar properly, always refer back to the URL. If the sidebar is minimized, instead of closed, you will notice &c=1 in the URL.
Below are three URLs which link to the same prototype, only the first one is correct for a Loop11 project.

Once you have closed the sidebar and retrieved the correct URL, you can be comfortable in the knowledge that your test participants will not need to do this step, you’re doing it for them!
After you have set all of the start URLs for your Loop11 project, the next thing you’ll need to do is decide whether you want to insert the Loop11 JavaScript into your prototype or use our no-code user testing option.
No-Code Option
If you do not want to insert the JavaScript into your prototype then there is nothing more you need to do. Set-up your test using the correct Axure URLs identified in this article and launch your test.
Alternatively, if you’d like to insert the JavaScript:
Inserting the Loop11 JavaScript
This couldn’t be easier. There are two ways you can find the Loop11 JavaScript.
- Launch your project. During the launch process (step 5 within Loop11) you will be shown the JavaScript you need to insert.
or - Visit My Account. This page contains the basic JavaScript which will suit the majority of Loop11 projects. The caveat here is if you are running an intercept or true intent study. If you are, please use the JavaScript supplied during a project launch. Additionally, if your test traverses across different domains or sub-domains you’ll find a link on the My Account page taking you a help article which can assist in facilitating this tracking.
Once you have your JavaScript head over to your Axure Share account and login. If you haven’t already registered your prototype then click on ‘New Project’ otherwise choose an existing project and navigate to ‘plugins’ via the ‘Configure’ menu.
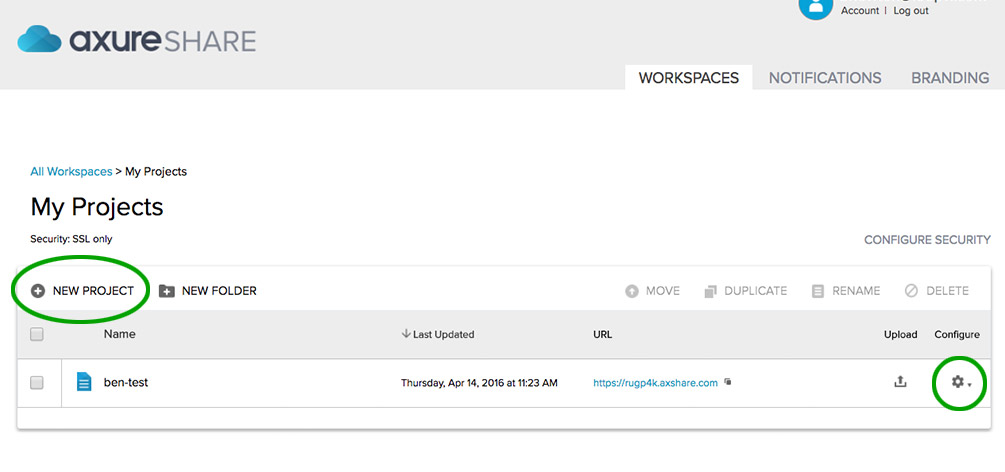
Then click on ‘New Plugin’, or ‘edit’ if you’ve already added the code previously.
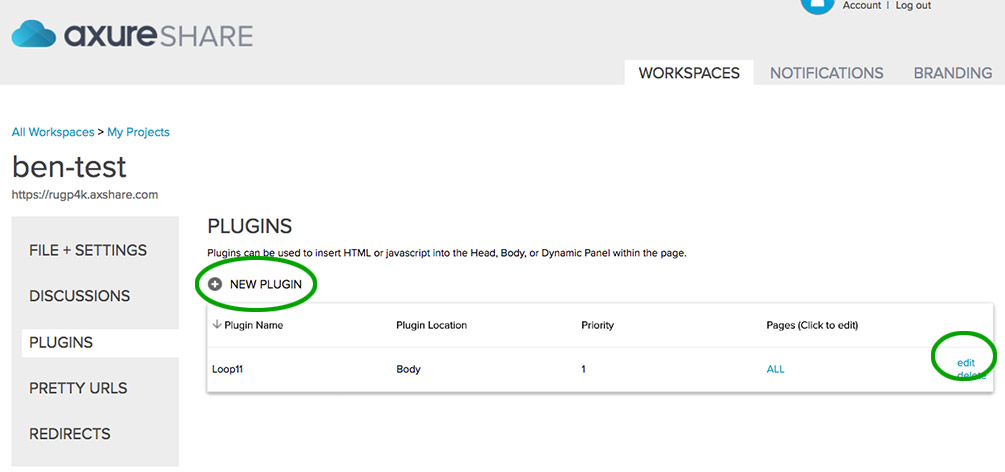
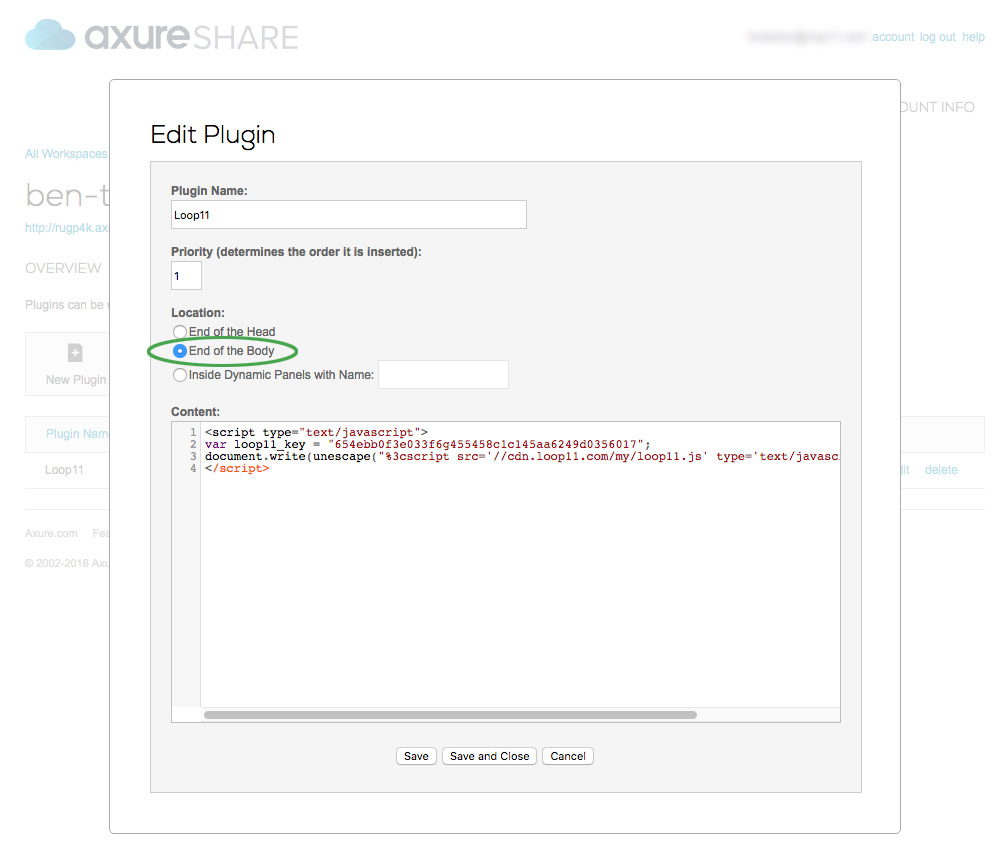
A pop-up window will appear and the first step is to give your plugin a name, like Loop11. You can set the priority to whatever you like, in the absence of any other argument you can keep it set to 1.
Next, set the location to ‘End of the Body’. This is important and refers to where the Loop11 code will be situated in the prototype’s code.
Lastly, you simple need to paste your Loop11 JavaScript into the ‘Content’ field. Once that is done, click save.
That’s it. Nothing more to do.
We always recommend running a test yourself. You can do this by using the Loop11 test link, such as https://rugp4k.axshare.com/home.html?l11_uid=90217, and appending &l11_mode=preview to the end of the URL. So it would become https://rugp4k.axshare.com/home.html?l11_uid=90217&l11_mode=preview.
Axure RP 9 and Above
If you are using Axure 9 or above the above steps for obtaining the correct URL have changed. Please view this video for the updated steps to obtaining the correct URL.
As always, if you have any questions or run in to any issues you can get help from our support team when logged in to Loop11.
Happy testing!
- Introducing Loop11’s Tester Panel - March 24, 2020
- Our Response to the Coronavirus - March 17, 2020
- Release Notes: 5 Second & First Click Tests, Image Testing& More… - October 17, 2018
![]() Give feedback about this article
Give feedback about this article
Were sorry to hear about that, give us a chance to improve.
